How Do I Transfer Outlook Express Files to Windows 10
 Migrating from Outlook Express, Windows Mail or Windows Live Mail to Microsoft Office Outlook used to be a relatively easy process but since these applications have been out of support for quite some time, it has become a bit more complicated to import this data into Outlook on the latest versions of Windows.
In addition to mail, this guide will also discuss how you can migrate your Contacts and Calendar.
- What data do I need to migrate?
- Scenario 1: Outlook is located on the same computer
- Migrate Mail
- Migrate Contacts
- Migrate Calendar
- Scenario 2: Outlook is located on another computer
- Scenario 3: You only have the message store files from OE, WM or WLM
- Alternative: Migrate via IMAP
- Alternative: Migrate via eM Client
- Alternative: Import eml-files directly into Outlook
- Additional Notes
In this guide;
– OE is used to refer to Outlook Express,
– WM is used to refer to Windows Mail,
– WLM is used to refer to Windows Live Mail,
– Outlook is used to refer to Microsoft Office Outlook.
What data do I need to migrate?
 What data you need to migrate depends on which mail account your are using in OE, WM or WLM and which additional data you have stored in the application.
- IMAP
When you are using OE, WM or WLM with an IMAP account, then there is no need to migrate your emails as these are synced with the mail server. Simply configure your IMAP account in Outlook, and Outlook will start synching the emails. - POP3
Emails from a POP3 account are stored locally, so these need to be migrated. It could be that you've configured your account to leave a copy on the mail server, but this would not apply to sent items, nor would that maintain your folder structure. - Local Folders
When you've created an additional folder structure outside your IMAP or POP3 account, these must be migrated as well. - Calendar and Contacts
Neither IMAP nor POP3 support synching the Calendar and Contacts folder, so these need to be migrated too.
Scenario 1: Outlook is located on the same computer
 In this scenario OE, WM or WLM contains all your messages and is located on the same computer as Outlook.
It is assumed that Outlook has already been installed and configured with your mail account. Contact your mail administrator or ISP if you do not know the mail account settings. If you've already tried to configure Outlook before but were not successful, you'll have to start with a clean mail profile.
Important!
During the migration process, you must be using the 32-bit version of Outlook. If you want to use the 64-bit version, you can remove the 32-bit version after the migration and install the 64-bit version. No settings or data will be lost during this process.
Migrate Mail
 Don't use the Import function from within Outlook to migrate your mail. In many cases this will reset the "Received" time and date on a message. Instead, use the export function from with OE, WM or WLM.
- Open Outlook.
- Open up OE, WM or WLM and use File-> Export-> Messages… to export the messages to Outlook.
- In older versions of WLM, you'll have to press the ALT button to see the File menu or press the
 icon.
icon. - In the latest version of Windows Live Mail, choose:
File-> Export email-> Email messages
- In older versions of WLM, you'll have to press the ALT button to see the File menu or press the
- When prompted to select the format you want to export email to, choose: Microsoft Exchange.
- When prompted, confirm the information dialog you get about exporting to Microsoft Outlook or Microsoft Exchange.
- Select which folder(s) you would like to export to Outlook.
- Now all you have to do is wait. This could take quite a while depending on how big your message store in OE, WM or WLM is.
Note:
If you can't directly find your items in Outlook after the export, look for a folder which is named after the account name that you have configured in Windows Live Mail. This folder should exist at the same level as your Inbox, Sent Items, Deleted Items, etc… folders. Expanding this folder will show you the folder structure that you had in WLM. You are free to move around the contents of these folders to other folders that you may have in Outlook.
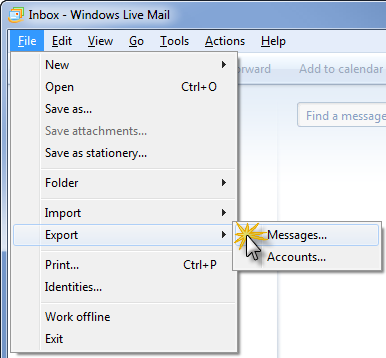
In an older or the Windows XP version of Windows Live Mail,
you'll have to press ALT on your keyboard to see the File menu.
Migrate Contacts
 To migrate your contacts, you'll first have to export them to a csv-file which you can then import into Outlook.
The way to export differs slightly depending on whether you are using OE, WM or WLM.
Export Contacts from Outlook Express
- File-> Export-> Address Book…
- Select; Text File (Comma Separated Values).
- Press the Export button.
- Select a location to store the export in and name you export file.
This can be on your Desktop folder for easy access. You can remove the file once everything has been imported into Outlook. - Press the Next button.
- Select all the fields (make sure you scroll down to see all fields)
- Press Finish. You'll get notified when the export is done.
- Close the remaining open dialogs and continue to the Import Contacts section.
Export Contacts from Windows Mail
- File-> Export-> Windows Contacts…
- Select; CSV (Comma Separated Values).
- Press the Export button.
- Select a location to store the export in and name you export file.
This can be on your Desktop folder for easy access. You can remove the file once everything has been imported into Outlook. - Press the Next button.
- Select all the fields (make sure you scroll down to see all fields).
- Press Finish. You'll get notified when the export is done.
- Close the remaining open dialogs and continue to the Import Contacts section.
Export Contacts from Windows Live Mail for Windows XP
- Select the Contacts button in the left bottom section or press CTRL+SHIFT+C to bring up the Windows Live Contacts window.
- File-> Export-> Comma Separated Values (.CSV)
- Select a location to store the export in and name you export file.
This can be on your Desktop folder for easy access. You can remove the file once everything has been imported into Outlook. - Press the Next button.
- Select all the fields (make sure you scroll down to see all fields).
- Press Finish. You'll get notified when the export is done.
- Close the remaining open dialogs and continue to the Import Contacts section.
Export Contacts from Windows Live Mail for Windows Vista, Windows 7 and Windows 8
- Select the Contacts button in the left bottom section or press CTRL+3 to bring up the Windows Live Contacts window.
- From the Home tab, click on the Export button and select;
Comma separated values (.CSV) - Select a location to store the export in and name you export file.
This can be on your Desktop folder for easy access. You can remove the file once everything has been imported into Outlook. - Press the Next button.
- Select all the fields (make sure you scroll down to see all fields).
- Press Finish.
- Continue to the Import Contacts in Outlook section.
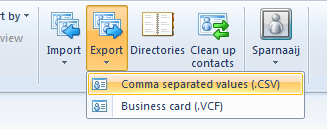
In WLM 2011, the Export button can be found on the
Home tab of the Contacts section.
Import Contacts into Outlook
- Start the Import and Export Wizard in Outlook;
- Outlook 2007 and previous
File-> Import and Export… - Outlook 2010 and Outlook 2013
File-> Open-> Import - Outlook 2016, Outlook 2019, and Office 365
File-> Open & Export-> Import/Export
- Outlook 2007 and previous
- Select; Import from another program or file.
- Press the Next button.
- Select; Comma Separated Values (Windows).
- Press the Next button.
- Browse to the location of the previously exported csv-file.
- Press the Next button.
- Select your Contacts folder as the destination folder.
- Press the Next button.
- Press Finish.
Note:
You may need to check and replace the delimiter used in your csv-file before you can import it. For more info see: Importing contacts from an exported csv-file fails.
Migrate Calendar
 Both Windows Mail and Windows Live Mail have a calendar function. However, only the Windows Mail app allows you to migrate the contents of the Calendar to Outlook.
Export Calendar Windows Mail
- Press the Windows Calendar button in Windows Mail or start Windows Calendar from the Start Menu.
- Select the calendar you wish to export.
- Choose; File-> Export…
- Select a location to store the export in and name your export file.
This can be on your Desktop folder for easy access. You can remove the file once everything has been imported into Outlook. - Press the Save button.
- Repeat the above steps for additional calendar you wish to migrate if needed and then continue to the Import Calendar section.
Export Calendar Windows Live Mail
Windows Live Mail can no longer sync the Calendar with Outlook.com/Hotmail and doesn't offer any Calendar export options. The only way to maintain the data is to forward the Calendar items one-by-one as emails. You will not be able to import it within your Calendar folder in Outlook.
Import Calendar into Outlook
- Start the Import and Export Wizard in Outlook;
- Outlook 2007 and previous
File-> Import and Export… - Outlook 2010 and Outlook 2013
File-> Open-> Import - Outlook 2016, Outlook 2019, and Office 365
File-> Open & Export-> Import/Export
- Outlook 2007 and previous
- Select: Import an iCalendar (.ics) or vCalendar file (.vcs)
- Press the Next button.
- Browse to the location of the previously exported ics-file.
- Press OK.
- Repeat the above steps for any additional calendars that you might have exported.
Scenario 2: Outlook is located on another computer
 In this scenario OE, WM or WLM contains all your messages and is not located on the same computer as Outlook. This makes things a bit more tricky as somewhere a conversion must take place.
There are 3 options available;
- Install Outlook on the old computer as well and use the above instructions to get everything into Outlook.
After this, backup your Outlook data on the old computer and restore it to the new computer as described in the guide; Backup and Restore all Outlook data. - Move the entire message store from OE, WM or WLM and reconfigure it with OE, WM or WLM on the new computer.
After this, use the instructions above to get everything into Outlook. - Use one of the alternative methods listed at the bottom of this guide.
- Migrate via IMAP
Upload your locally stored emails to an IMAP account in OE, WM or WLM and then configure this account in Outlook to download it again. - Migrate via em Client
Import Outlook Express dbx-file into eM Client and then use the export feature in eM Client to create folders containing eml-file. - Import EML Files directly into Outlook
Use a script or tool to import the WM or WLM data store or the OE export from eM Client directly into Outlook.
- Migrate via IMAP
If you choose the first option, note that there is no need to activate Office/Outlook on the old computer. It will install in a fully functional trial mode which allows you to go through this process. If your new computer came pre-installed with Outlook and/or you don't have an Office installation CD, then you can also download a trial of Office 365 Home or download a new installation medium for Outlook 2007 / 2010 / 2013 / 2016 / 2019.
If you choose the second option, then you'll have to locate and backup your Store Folder of OE, WM or WLM. To do this choose;
- To determine the location of your Store Folder go to;
- Outlook Express
Tools-> Options…-> tab Maintenance-> button Store Folder… - Windows Mail for Vista and Windows Live Mail for Windows XP
Tools-> Options…-> tab Advanced-> button Maintenance…-> button Store Folder… - Windows Live Mail for Windows Vista, Windows 7 and Windows 8
File menu-> Options-> Mail…-> tab Advanced-> button Maintenance…-> button Store Folder…
- Outlook Express
- Copy the path in the dialog you see now (select the text with your mouse and choose CTRL+C).
- Close OE, WM or WLM.
- Open Windows Explorer to browse your computer and paste the location in the address bar at the top (CTRL+V).
Press Enter to open the folder. - Select all the files and folders from that location and store them to a backup location such as a CD/DVD, external hard disk or USB Flash Drive.
- Continue to the "You only have the message store files" section.
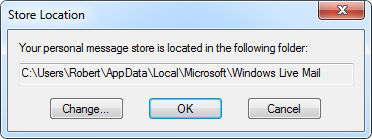
The Store Location of OE, WM and WLM contains all the data
that you need to transfer to your new computer.
Scenario 3: You only have the message store files from OE, WM or WLM
 In this scenario, you have the entire message store from OE, WM or WLM on your hard disk or a backup medium. In order to get that data into Outlook, you must first configure that data with OE, WM or WLM again before you can import it into Outlook.
Note:
- If your message store is from OE, then you can use OE, WM or WLM on your Outlook computer to restore it.
- If your message store is from WM, then you can use WM or WLM on your Outlook computer to restore it.
- If your message store is from WLM, then you can use only WLM on your Outlook computer to restore it.
If neither of them are installed on your computer, you can use the IMAP method, the Import EML-Files method or the eM Client method since Microsoft no longer offers Windows Live Mail for download.
- Copy the contents of your backup to a folder on your new computer.
This can be a folder location on your Desktop for easy access. You can remove the folder once everything has been imported into Outlook. - Right click the folder containing the message store and choose Properties. Here make sure the "Read Only" attribute is not selected.
- Open OE, WM or WLM on the new computer.
- Cancel any account creation dialogs so that you'll be taken to your Inbox folder.
- Choose File-> Import-> Messages…
- Select from which application your message store is from.
- Click Next.
- When prompted, select that you want to import from a store directory and click OK.
Otherwise, directly select the location of where you have restored your backup. - Make a selection of which folders you would like to import or choose All folders and press Next.
- Press Finish when you're notified that the export is done.
- Now that your original data from your old computer is configured in OE, WM or WLM on your new computer, you can use the first section of this guide to get your messages into Outlook on your new computer.
Alternative: Migrate via IMAP
 In case you can't install Outlook on the computer containing OE, WM or WLM, you could also consider migrating your locally stored mail data via an IMAP account.
Make sure the IMAP account has sufficient storage space or use an account from Outlook.com or Gmail to (temporarily) store the data in. You don't actually have to use the Outlook.com or Gmail address for this afterwards.
To configure the Outlook.com or Gmail account as an IMAP account in OE, WM or WLM you can use the mail server settings which are published here.
Once the account has been configured, you can move the folders from your local storage into the IMAP account. For the default folders, such as Inbox and Sent Items, you must move the individual emails. Note that you can select multiple emails at once or select them all via CTRL+A.
It's recommended to upload 1 folder at a time and await synchronization by verifying the contents of the folder via the Webmail client of the IMAP account.
Once everything has been uploaded, you can configure the IMAP account in Outlook to download all the emails again. Note that it is recommended to configure an Outlook.com account as an Exchange account instead. Outlook will do this automatically via the Add Account wizard.
You can leave the account in Outlook or you can move the contents out of it and remove the account.
Alternative: Migrate via eM Client
 As Outlook Express and Windows Mail are no longer part of any supported Windows version and Windows Live Mail is no longer available for download, you might find yourself stuck when you only have the message stores like in Scenario 3, especially when you only have the dbx-files from Outlook Express.
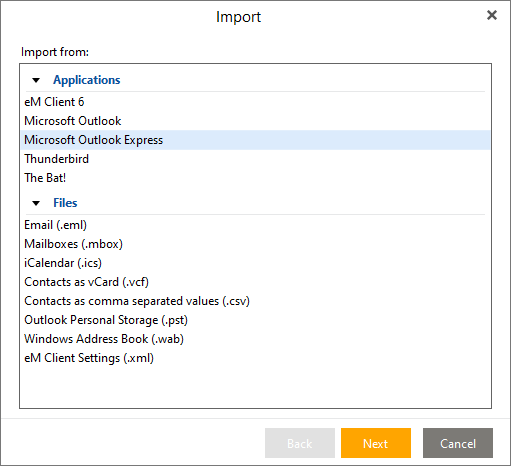
Luckily, there is a free alternative email application called eM Client which allows you to import the message stores of Outlook Express and Windows Live Mail.
-
Menu-> File-> Import…
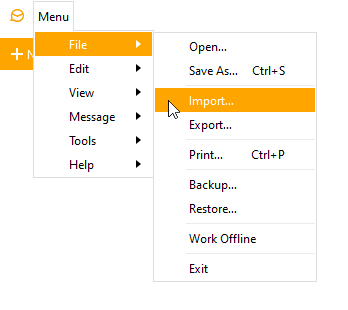
To import dbx-files from Outlook Express, simply select "Microsoft Outlook Express" and browse to the folder containing your dbx-files.
To import data from Windows Mail or Windows Live Mail, select "Email (.eml)", browse to the folder which contains your WM or WLM data store and also select the "Include subfolders" option. Note that this is not needed when you want to import WM or WLM data into Outlook.
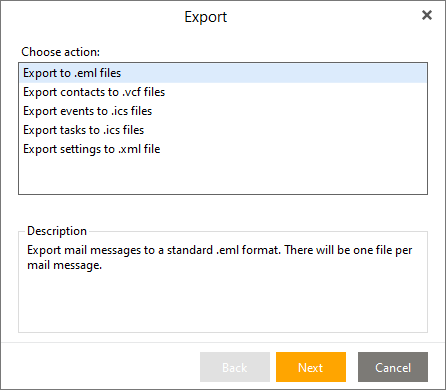
Optionally, it also allows you to export all your emails as eml-files (stored per folder), which you can then import into Outlook.
Alternative: Import EML Files directly into Outlook
 When you have emails stored in the eml format, then you can open these in Outlook but you can also import them in bulk. This allows you to import emails you obtained in one of (but not limited to) the following scenarios;
- You've saved emails as eml-files when you were using OE, WM or WLM.
- You have a WM or WLM store which you want to import directly into Outlook as these are just folders containing eml-files.
- You've imported your OE dbx-files into eM Client and then exported them as folders containing eml-files.
For methods and detailed instructions on how to bulk import eml-files into Outlook see: Importing eml-files into Outlook.
Additional Notes
 After you have configured Outlook, you might want to remove the account configuration from within OE, WM or WLM via the Tools-> Accounts… menu or via File menu-> Options-> Accounts… in WLM for Windows Vista, Windows 7 and Windows 8.
If you are running into any issues with OE, WM or WLM, you can use the following forums;
- Outlook Express on Windows XP
- Windows Mail on Windows Vista
- Windows Live Mail on all Windows versions
How Do I Transfer Outlook Express Files to Windows 10
Source: https://www.howto-outlook.com/howto/migratefromoewlm.htm

0 Response to "How Do I Transfer Outlook Express Files to Windows 10"
Post a Comment